You have real, valuable expertise to share with your students.
That’s why you’re selling an online course chock-full of content that will help your students accomplish their goals, change their way of thinking, or master a skill that they’ve always wanted to learn.
With so much to share and teach, how can you make sure that you reach as many students as possible — including those who might not be able to pay hundreds of dollars for your course upfront?
You could make your content cheaper, of course, but you’ve put time and money into creating your course, and you’re trying to grow your business.
Enter payment plans.
When you offer payment plans, students can pay for your course with monthly installments rather than a lump sum upfront. You still get paid — and you help people afford the content they need.
Here’s how to set up payment plans with Podia, plus examples of how offering payment plans helps creators sell more courses and inspire more students.
How to set up payment plans with Podia
Podia’s all-in-one platform gives you the tools you need to create, host, and sell your online courses — including an online course builder with settings that make it easy to set up payment plans for your customers.
Here’s how you can use Podia to offer payment plans and start accepting monthly payments from your customers, so you can make your content accessible to the people who need it.
(Want to follow along, but don’t have a Podia account? Sign up for a free 30-day trial.)
Step 1: Create a new product or choose one to edit
In your Podia dashboard, navigate to the “Products” tab.

You can choose to create a new product or add a payment plan to an existing one. For our example, we’ll create a new online course.
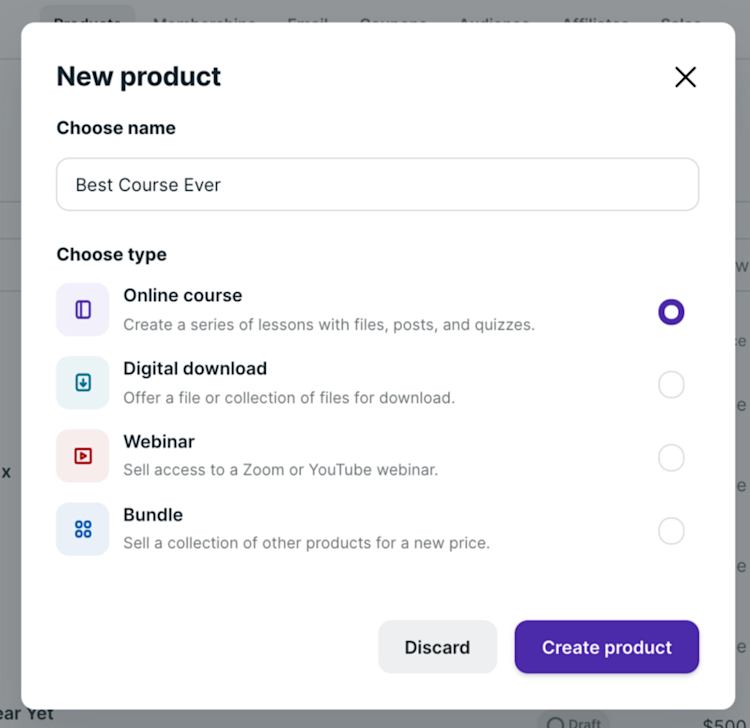
To create a new online course, click “New product,” then select “Online course”. Name your course and click “Create product”.
Step 2: Add sections to your course
Click “New section” to add a section to your course.

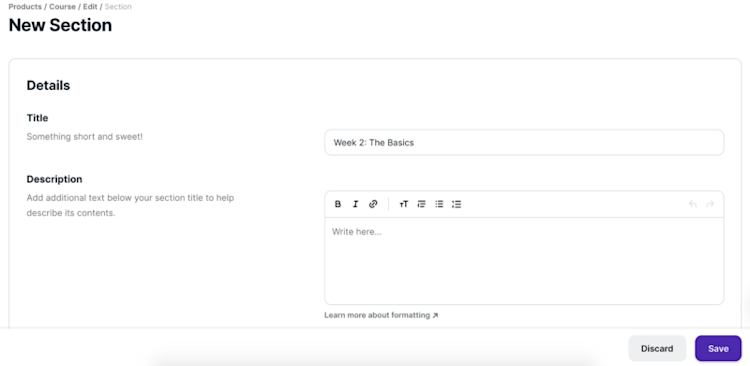
Give your new section a name. Then, add a description. Let your students know what the section’s content will focus on and what outcomes they can expect. Click “Save”.
Repeat this process to create each section of your course.
Step 3: Add content to each section
Once you’ve created each section, add content by clicking “New lesson,” then selecting the type of content you want to include.

We won’t get into the ins-and-outs of creating course content in this post, but we recommend including a mix of content types, such as videos, workbooks, tutorials, quizzes, and more.
Here are some great resources to get you started:
Step 4: Set an (optional) start date
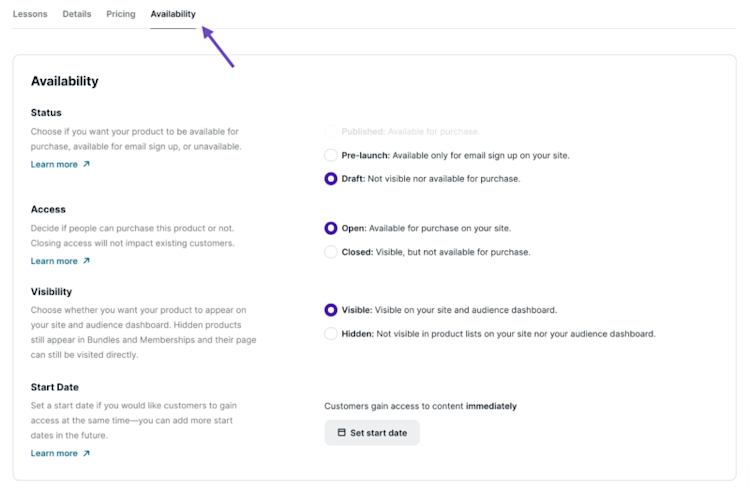
Once you’ve added all of your course content, click “Availability”. Here you can change your course access and visibility.
You can also add a start date to your course if you want all of your students to start on a specific date. For example, if you plan to host live webinars as part of your course, having a set start date will keep all of your students on the same schedule.
Step 5: Set up course pricing
Next, click over to the “Pricing” tab.
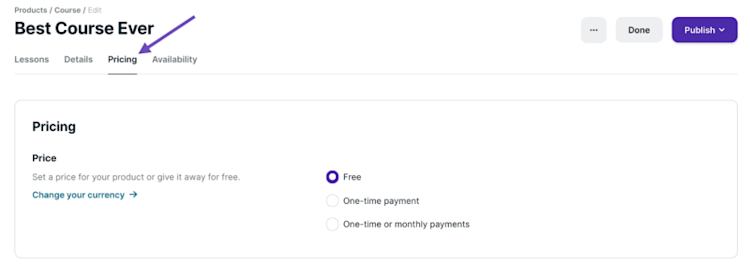
If you haven’t already set up payments in Podia, click “Accept online payments” and connect your Stripe or PayPal account by following the steps in this guide.
While you can accept one-time payments via PayPal, you’ll need to connect a Stripe account to collect recurring payments for payment plans or membership communities.
Once you’ve connected your Stripe account, set the lump-sum price for your course. (If you’re not sure what to charge, check out this article on pricing online courses and this guide to pricing and packaging online courses.)
After you set your full price, you can set up an optional payment plan.
But first, how do you know if you should offer a payment plan?
There’s no hard-and-fast rule, but if your course costs over $100 or takes longer than 10 hours to complete, a payment plan can make it accessible to more students — and help you make more sales.
For example, marketing expert Val Geisler offers her exclusive Email Marketing Mastery Incubator for an upfront payment of $5,000 or three payments of $1,750. It’s a high-cost — and high-value — 12-week program, so it makes sense for Val to offer payment plans to her students.
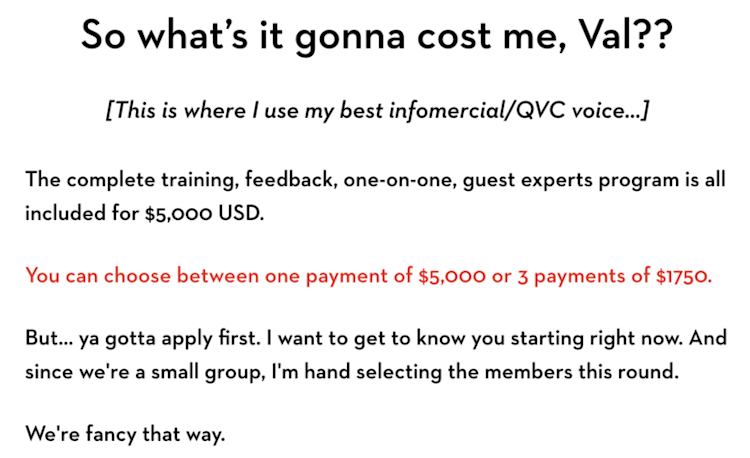
Like Val, many creators choose to make the total installments add up to slightly more than the pay-in-full price, in exchange for the flexibility of paying in installments — kind of like charging interest.
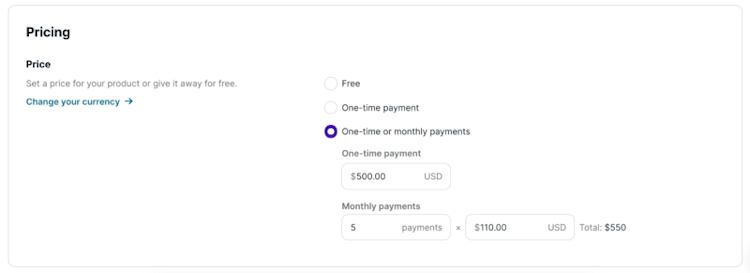
OK, back to the “Pricing” tab. Set your price per payment and the number of installments you want your payment plan to have. If you’re not sure how long your payment plan should be, two to six months seem to be the most common for creators across industries.
Step 6: Preview your course
After you set up pricing, it’s time to preview your course. Use the three-dot dropdown, then select “View as customer” or “View as visitor”.

Step 7: Publish your course
If you’re satisfied with your course preview, click “Publish,” then select “Publish”.

And just like that, your course is live — and you’re ready to start collecting monthly payments.
Step 8: Automatically collect recurring payments
When a student enrolls in your course and chooses the payment plan option, you’ll automatically collect their scheduled payments on the due date each month.
Podia will even send automatic messages to students whose credit cards may have expired, asking them to update their payment information and notifying you of any failed payments.
It’s all taken care of for you, so you can spend less time worrying about late payments and more time creating awesome content for your students.
Why should you offer payment plans?
Flexible payment plans make it easier for customers to afford big-ticket items like expensive online courses and annual memberships — and it makes them more likely to buy from you, too.
But don’t just take my word for it:
-
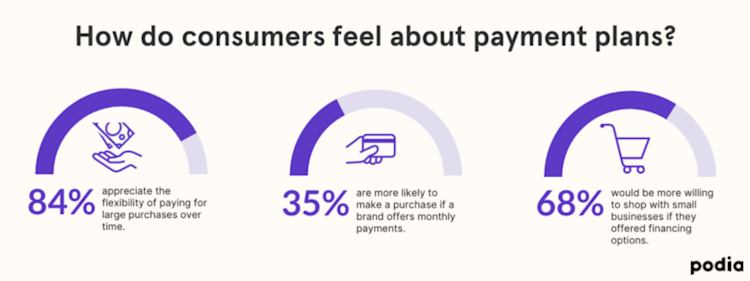
84% of consumers appreciate the flexibility of paying for large purchases over time.
-
35% of consumers are more likely to make a purchase if a brand offers monthly payments.
-
68% of Americans said they would be more willing to shop with small businesses if they offered financing options.
Plus, 36% of shoppers say that financing helped them purchase a more expensive product than they previously considered. A product like, say, Steve Chou’s Create A Profitable Online Store course.

Entrepreneur Steve Chou of My Wife Quit Her Job learned the power of monthly payments first-hand. Steve offers three payment options for his online course:
-
$1,999 upfront
-
$699/month for three months
-
$299/month
These payment plan options make Steve’s online course affordable for more potential ecommerce entrepreneurs.
And it’s helped his conversion rate, too — payment plans have helped Steve bring in “approximately 27% more customers than if I only offered a single, lump sum payment”.
When more people can afford your courses, you make your expertise accessible to more students. And when more students can access your content, you have a bigger opportunity to inspire, teach, and change lives.
Bringing that inspiration and empowerment to more women is exactly what Jenny Lachs, founder of Digital Nomad Girls, does through her Stop Dreaming, Start Packing! course.
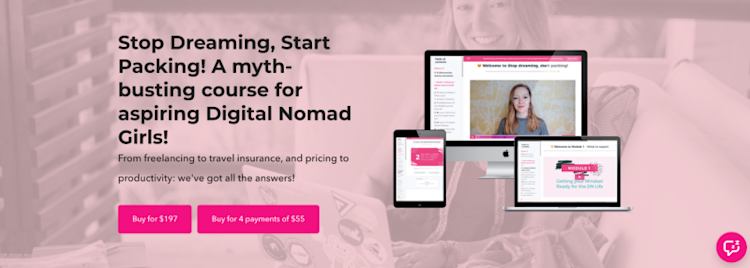
“I know how hard it is to make the transition to the digital nomad lifestyle because I had to figure it all out myself when I started out my journey 5 years ago,” Jenny explains. “But I also know that if I can do it, then so can you.”
By offering a payment plan for her course, Jenny makes her experience and expertise accessible to even more people, giving more women the tools they need to start their own businesses and create the lifestyle they want.
Podia makes it easy for creators like Jenny to start selling more courses — and inspiring more students — with payment plans.
Basically:
When you offer payment plans, you can sell more courses, create a steadier cash flow for your business, and give more people the opportunity to learn.
Now that’s a win-win-win.


