When you’re in the early stages of creating a new digital product, it feels like there are a million pieces to figure out. Is there a market for this? What will your final product look like? Who is your target audience?
You don’t have to wait until you have a finished product to answer all of those questions.
In fact, you can’t afford to wait that long.
If you don’t create something that solves a real problem for your audience, your new product won’t even make it off the ground.
That’s where prototyping comes in. It might sound complicated or intimidating, but creating and testing a prototype can be more simple, cost-effective, and faster than you think.
Today, we’re sharing five steps for turning your digital product idea into a prototype and collecting valuable user feedback.
Before we dive in, let’s go over the basics.
What is a prototype (and why should you create one)?
A prototype is any product — no matter how simple — that helps you get feedback on the product that you’re working on.
From mobile apps to physical products, creators across industries build prototypes to test out their ideas. The main purpose of your prototype is to learn what your customers want, so you can design a product that they love.
At the end of the prototyping process, you’ll end up with a minimum viable product (MVP). An MVP is a simplified test version of your product that lets you measure audience feedback and learn more about your customers.
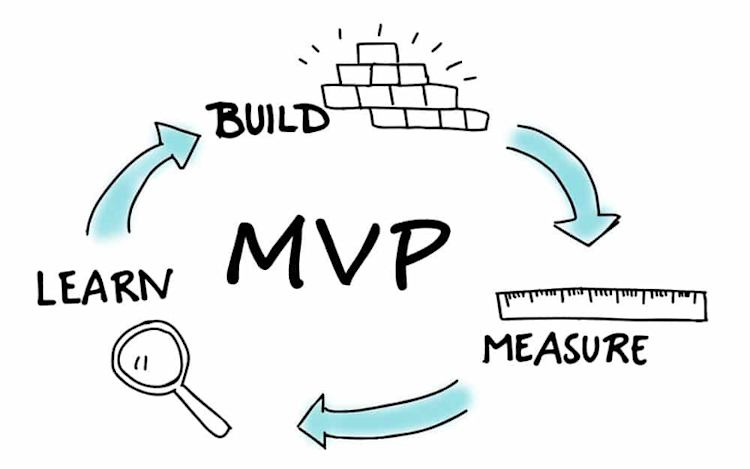
Your MVP shouldn’t include every feature under the sun. You won’t know what functionality your audience wants and needs until you test your MVP.
Rapid prototyping also saves you time and resources down the line. It’s faster and less expensive to create a prototype than to build a full-fledged product.
The sooner you can get your MVP into the hands of your users, the sooner you can get their feedback. And the quicker you learn about your audience and their desired user experience (UX), the more easily and quickly you can implement those findings for your end product.
Prototyping is a vital part of the UX design process. The goal of good UX is to make it as easy and enjoyable as possible for customers to use your product, contributing to the overall customer experience.
Offering a great customer experience can boost your sales and help you stand out in a crowded market.
In 2013, a Walker study predicted that by the end of 2020, customer experience would overtake price and product as the key brand differentiator. And their prediction is coming true.
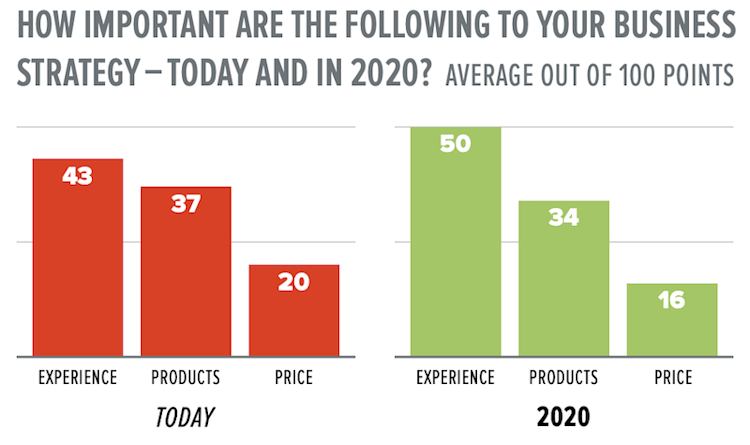
Gartner found more than two-thirds of companies compete primarily based on customer experience, up from only 36% in 2010. Plus, 86% of buyers will pay more for a better customer experience.
Bottom line:
Building and testing a prototype lets you gather the valuable user feedback you need to create that stellar customer experience, whether your end product is an online course, digital download, or something else entirely.
Now that you know why prototyping is so important, let’s get into the “how” of it all.
5 steps to create your first prototype
Step #1: Define the problem your product will solve
First and foremost, your product needs to solve a real-world problem for your customers. 35% of startups fail because there’s no market need for their products or services.
In other words, there’s no product-market fit.
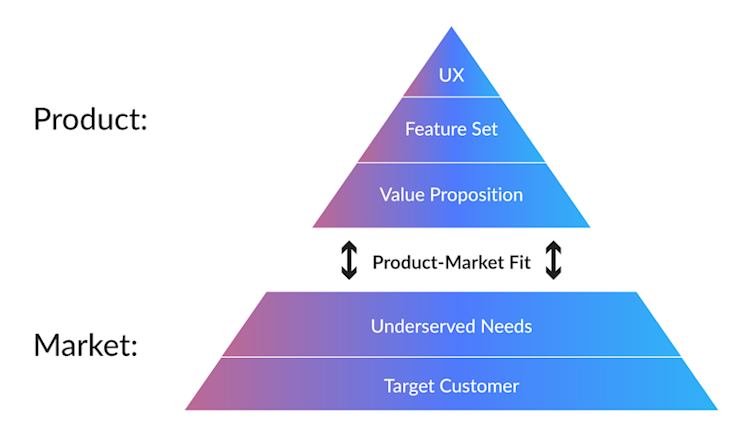
Your product-market fit is how well your product meets customer demand.
One example of excellent product-market fit is Casper. Philip Krim founded Casper when he saw there were only two major mattress brands on the market and significant opportunities for innovation.
Similarly, Sara Blakely got her idea for Spanx undergarments when she couldn’t find anything flattering or comfortable to wear under white pants.
Start with the result you want to offer your customer, then work backward to determine how your product will achieve that result. That’s your unique selling proposition (USP).
Your USP answers two questions:
-
What problem am I solving with my product or service?
-
What makes my product different from my competitors?
Your USP is your “special sauce”. It’s what sets you apart from the competition and makes potential customers choose you. It also helps you figure out how to market your product.
At this stage, you may think you know exactly what problem your audience needs solved. But don’t rush into building the solution. Instead, it’s time to validate your product idea with research — which is the next step in our prototyping process.
Step #2: Conduct customer research
When designing your prototype, it’s critical to figure out:
-
What problem you want to solve
-
If your solution is something that your audience will be willing to pay for
One of the most important questions to ask before starting a business is, “Who is my target audience?” The more you get to know them, the easier it will be to create a prototype that fits their needs.
To find out what your target audience is interested in achieving, learning, and buying, you need to conduct customer research.
Spend a day looking at forums and online communities related to your product topic. Ask yourself:
-
What is my target audience talking about?
-
What questions are they asking each other?
-
What challenges do they face?
-
What new skills do they want to learn?
Reviews are another great source of qualitative audience insights. Find other products in your niche, then read the reviews.
Let’s say you want to sell info products that teach beginners how to make homemade pasta from scratch. You could hop onto Amazon and read the reviews of similar books, like Homemade Pasta Made Simple:
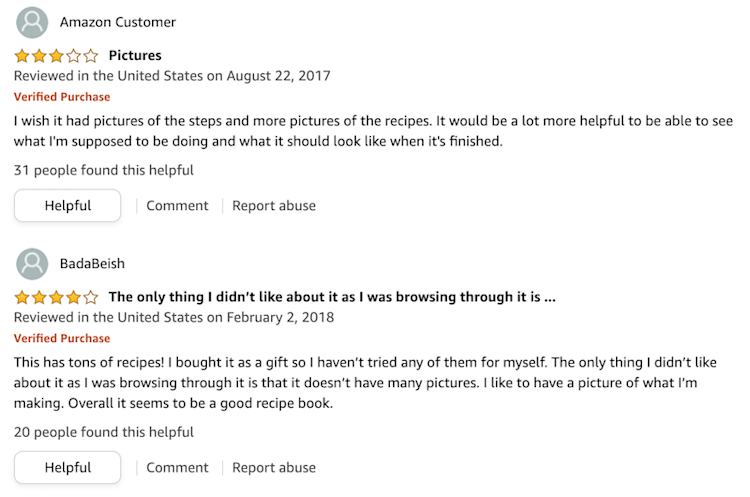
From these reviews, you learn that beginner at-home pasta chefs want visual cues to help them learn. Now you know that you need to include photos and diagrams in your prototype.
If you already have an audience or online community, don’t be afraid to ask them directly what they’re looking for in a product.
Tiffany Williams, the founder of CEO InsideHER, learned what products and content her audience wanted by listening to their questions and feedback.

She kept receiving questions about her business success and found that people wanted to learn what she did to grow her side-hustle into a full-time career.
“People really want to learn and know what they can do to start either a side-hustle to make some extra money or to be able to leave their job so they can do it full-time,” Tiffany told us.
“I just ask my audience what they want, what they want to learn, and if it matches something that I have done, and I have been successful with, then I teach it to them.”
You can gather your audience’s feedback by sending a survey to your email list. Ask them about their pain points and what they’re looking for in a solution.
Survey tools like SurveyMonkey, Typeform, and Google Forms make creating and sending out surveys a breeze.
Another option is to engage with customers on social media.
Take creator John D. Saunders, for example. John asks his Twitter audience for feedback on his initial ideas before publishing or selling an online course.
In this tweet thread, John explains how he involves his audience in the course creation process:
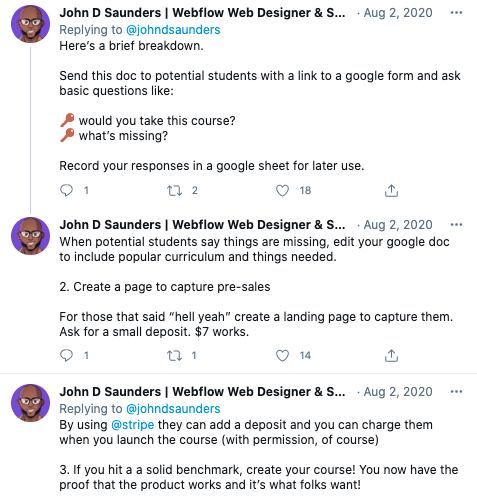
Validating his product idea with his audience paid off — to the tune of $10,000 in course sales on John’s launch day.
(P.S.: Podia makes it easy for creators like John to build and sell online courses, digital downloads, coaching sessions, and more. Sign up for a free 30-day trial today.)
As you gather audience research and feedback during this step, make sure to note down as much information as possible — no matter how tiny the details. The more insights you put together now, the more effective our next step will be.
Step #3: Organize your research and ideas
Once you gather as much customer info as you can, it’s time to get organized, so you can turn your research into a prototype. In this stage, you’ll narrow down your focus from a broad idea to an actionable outline of your MVP.
If you’re not sure where to start, try creating an affinity diagram.
Affinity diagrams, also called cluster maps, are a UX design tool for organizing qualitative information into different groups or themes. This visualization can help you figure out which information is related and how frequently different themes pop up.
It ends up looking a little something like this:
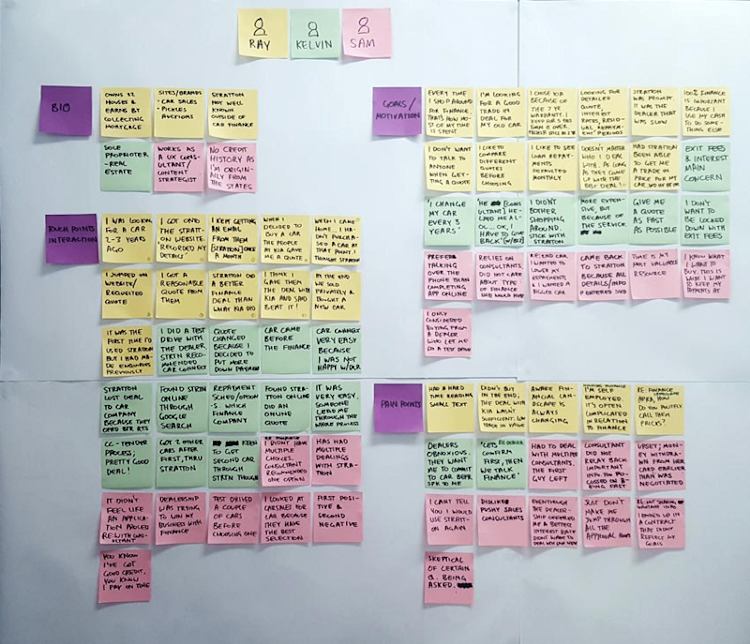
Here’s how to create an affinity diagram:
-
Record all of your ideas and observations on sticky notes.
-
Look for related ideas, then group them together.
-
Define and name each group. What is the main thing each note in that group has in common?
-
Sort sticky notes into groups until all notes have been sorted.
-
Decide which groups are the most important to focus on in your prototype. What features or ideas come up the most in your research? Which groups have the most sticky notes?
If you’d rather create your affinity diagram digitally, design tools UserTesting and InVision offer an affinity diagram template that lets you import and organize your UX research on your desktop.
Another tool we love for narrowing down digital product ideas is the Passion/Profit Matrix.
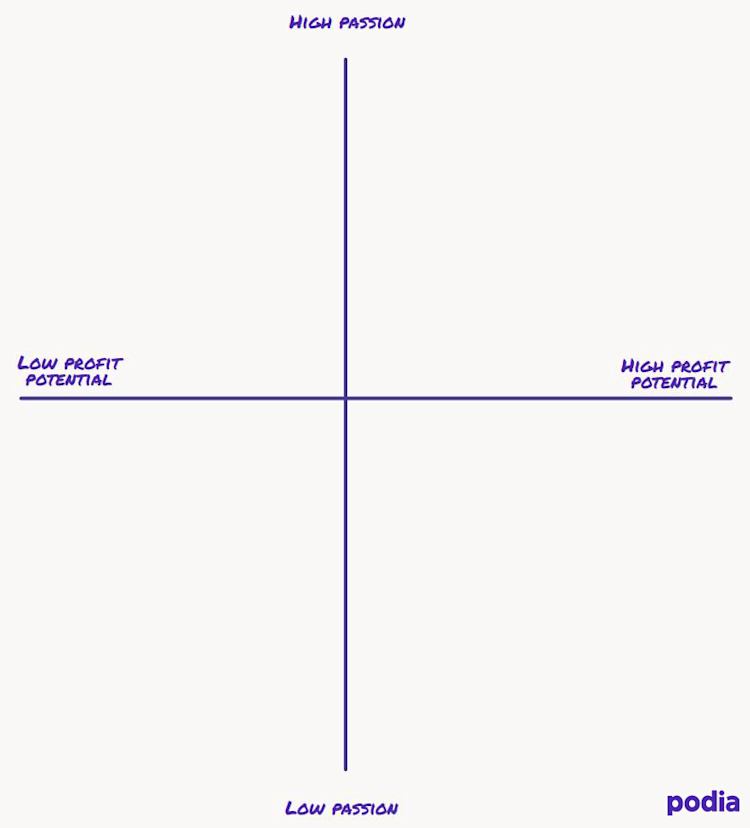
The Passion/Profit Matrix helps you answer two critical questions:
-
Passion: How excited are you about this product idea?
-
Profit potential: Do people already spend money to solve this problem?
Use the research you completed in step two to plot your product ideas on the matrix. You want to choose the idea that fits into the upper-right quadrant.
At the end of this step, you should have a solid idea of your product and the most important features to include in your prototype. Now, you’re ready to build your MVP.
Step #4: Build and share your MVP
An MVP is more than a wireframe or mockup. It’s a real product that your users can test out, then share their feedback with you.
Remember, though, that this is just an iteration, not the finished product. You don’t need to include every single detail. Instead, focus on the features that came up the most in your research. Your MVP should give your customers a preview of the end product.

For example, photo-sharing website Unsplash started as a Tumblr blog with ten photographs. Product Hunt started as a link-sharing website called Linkydink.
Going back to our homemade pasta example, let’s say that your end goal is to build an online course that teaches students everything they need to know about pasta making, from the history of different shapes to the right kinds of flour.
For your MVP, you could build a mini-course with just the basics of pasta-making or write a five-page ebook covering one skill, like making homemade linguine.
No matter what your MVP turns out to be, you need to get it in front of your audience.
One of the best ways to build a customer list for your MVP is with a landing page.
Unlike your website homepage, a landing page is a standalone page that focuses on one specific conversion goal.
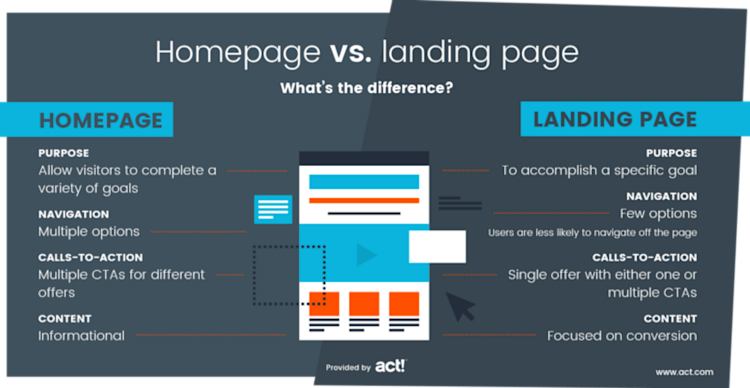
You can use your landing page to sell a working prototype directly to your customers or collect email signups before your product launch. The latter is called pre-launching.
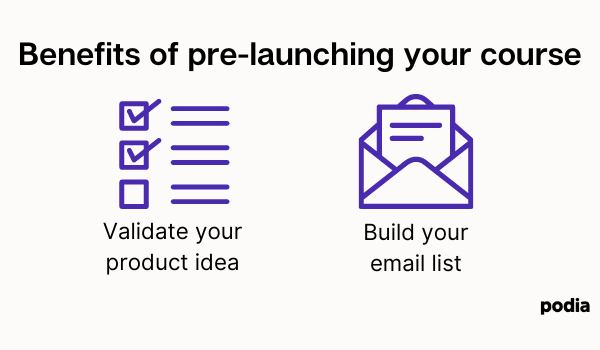
Pre-launching your digital product has two big benefits:
-
Validating your product ideas.
-
Building your email list leading up to your product launch.
On your landing page, include a short description of your MVP, pricing, an FAQ section, and social proof (like customer testimonials).
Here are some additional landing page essentials to keep in mind:
-
Use your customer research from step two to write copy that’s relevant to their goals and pain points.
-
Focus on your product’s benefits, not just its features. Tell your audience exactly how your product will positively impact them.
-
Keep your landing page easy to scan and stick to one call-to-action (CTA).
-
More than half of web traffic comes from mobile devices, so make sure that your landing page is mobile-friendly.
For more tips, including landing page templates, check out this guide to landing pages for digital creators, plus these landing page best practices.
Once you get your MVP in front of your users, it’s time for the final — and most important — step in the prototyping process.
Step #5: Gather user feedback
Finally, it’s time to collect and implement user feedback on your MVP.
Here’s the good news: Your customers want to share their feedback with you. 90% of shoppers have a more favorable view of businesses that ask them to provide feedback.
If you don’t have a ton of users to reach out to for feedback, don’t worry. According to Jeff Sauro of MeasuringU, testing just five users can turn up 85% of the problems in an interface.
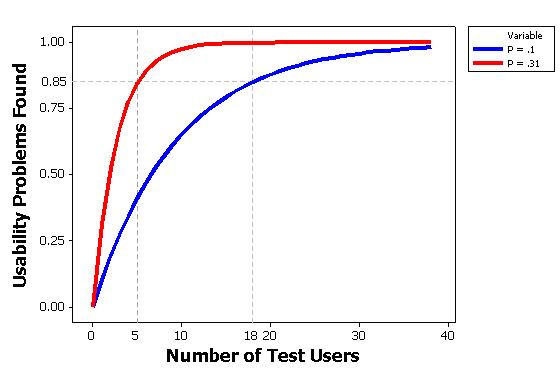
That means that testing your MVP can be as simple as asking five people to test out an interactive prototype. As they move through the workflow, ask them to document how they interact with your product and share their thoughts on the visual design and usability.
Make it easy for users to share their feedback, whether that means hopping on a five-minute phone call to listen to their feedback or sending out another survey through Typeform or Google Forms.
After collecting, you can use the affinity diagramming from step three to organize the new information. Then, apply that feedback in the next iteration of your MVP.
You’ll probably need to release several versions of your MVP to create the best possible product for your customers.
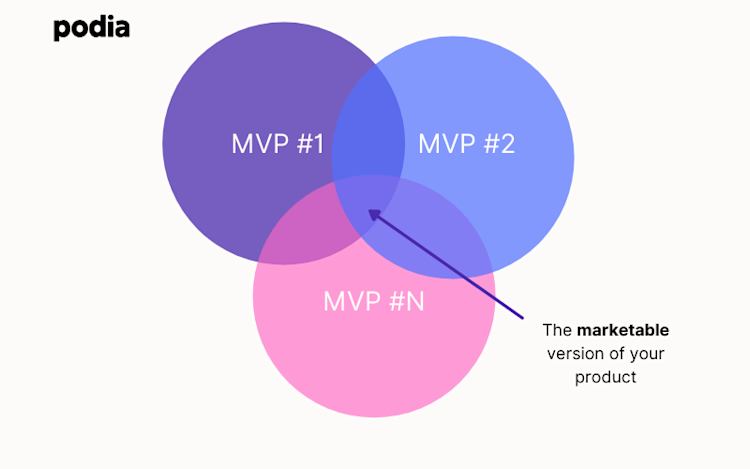
Once you test all multiple MVPs, you’ll have all of the information you need to launch your minimum marketable product (MMP), a sellable version of your MVP. When you do, continue asking your users for feedback.
All in all, product development is a cycle, not a linear process. The more you learn about your customers, the more you can iterate on your product until you build something your customers love.
The path from product idea to digital prototype
Going from an idea to your finished product is a long process — but creating a prototype and launching an MVP can make a huge difference.
When you build and test a prototype, you gather valuable information and feedback that helps you make the best product for your audience.
Here are five steps to creating a prototype for your digital product:
-
Find a problem that needs solving.
-
Conduct customer research to discover your audience’s pain points and goals.
-
Organize your research to determine the most critical issues to address and features for your product.
-
Use those findings to build your minimum viable product (MVP) and create a landing page to share it with the world.
-
Gather and implement feedback from your initial users, then launch the next iteration of your MVP.
Your audience is waiting for a unique solution to their problems, and you have the ideas and expertise to give them one. All you have to do is get started.


